

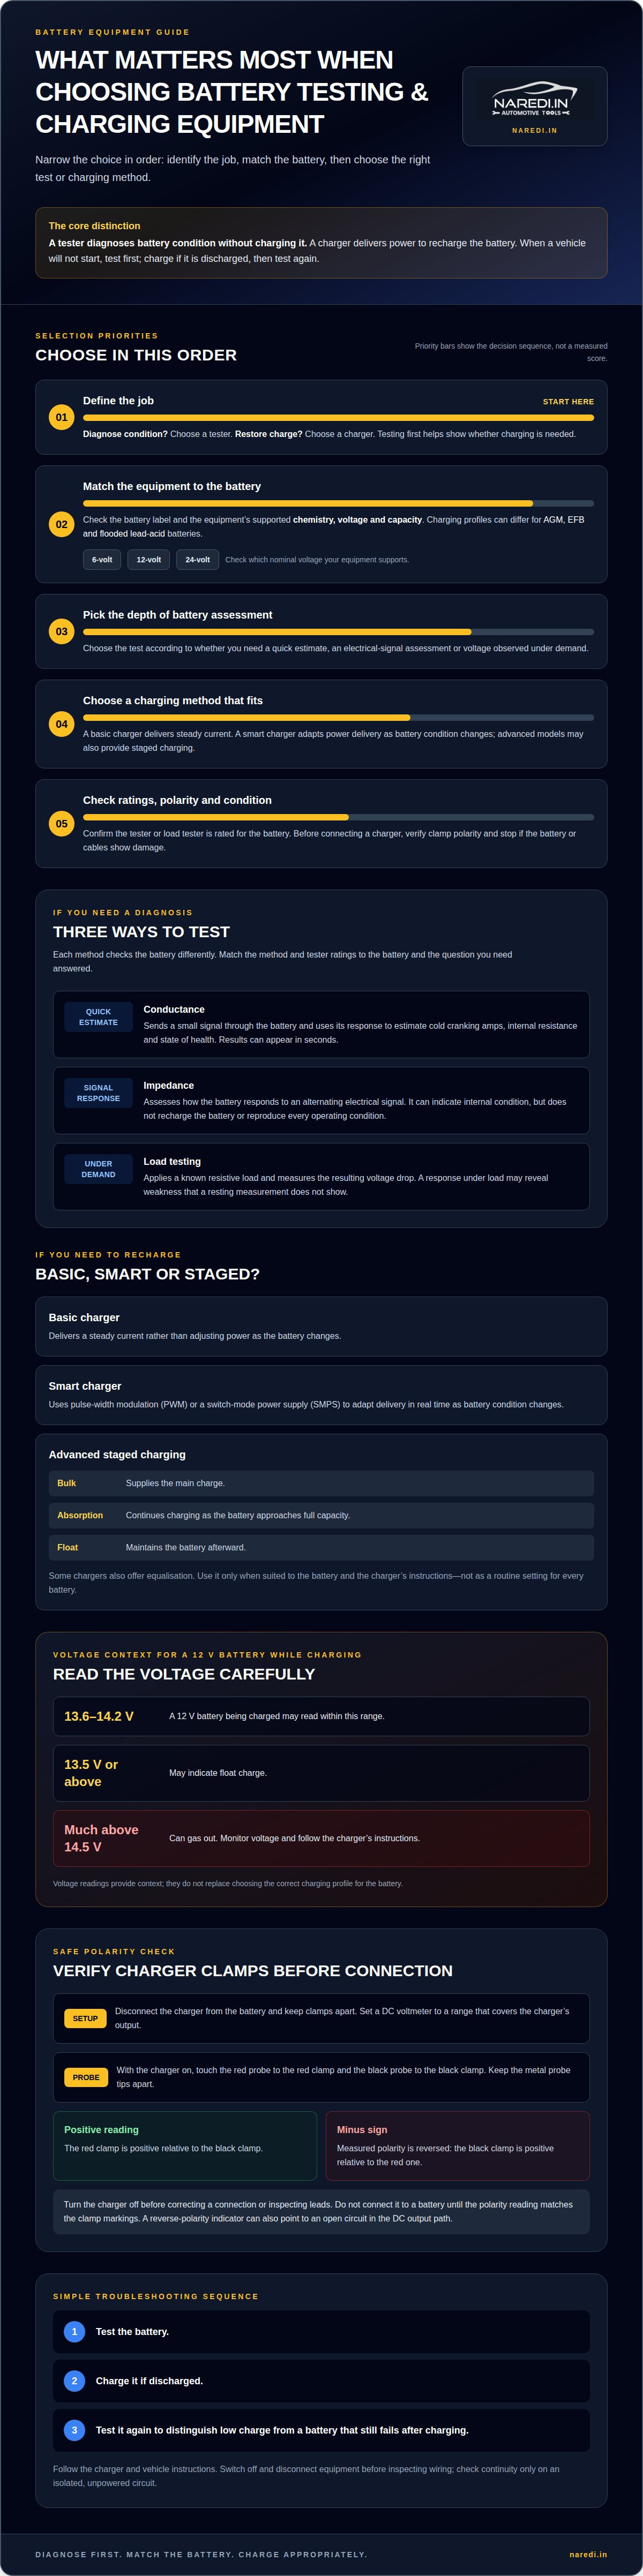
The tool that restores a battery isn’t the one that diagnoses it. A battery charger delivers power to recharge a battery, while a tester checks its condition without charging it. Choose a battery charger or tester according to whether you need to restore charge or assess battery health.
The two tools can seem interchangeable, especially when a vehicle won’t start. But testing first helps show whether the battery needs charging. When you choose a charger, its charging method must also match the battery type.
This guide explains what conductance, impedance and load tests can reveal, how basic and smart chargers deliver power, and how to check clamp polarity with a DC voltmeter. You’ll also learn how to choose equipment for your battery and intended use, whether you’re maintaining a vehicle battery or diagnosing one that isn’t performing as expected.
Key Takeaways
- Choose a tester to diagnose battery condition, then use conductance, impedance or load testing to match the depth of assessment you need.
- Match the charging method to the battery type; smart chargers adjust power delivery, while advanced models can use staged charging.
- Check clamp polarity with a DC voltmeter while the charger is on and disconnected from the battery.
- Before choosing a tool, match its supported battery voltage and capacity to the battery you need to test or charge.
Conductance, impedance and load testing
- Choose a tester when you need a diagnosis, not a recharge. Battery testers assess condition without delivering charge. Conductance, impedance and load testing are common methods, and each checks the battery differently. First decide whether you need a quick condition estimate or a reading under electrical demand. This helps you choose a tester suited to the task.
- Use conductance testing for a quick battery assessment. The tester sends a small signal through the battery and uses its response to estimate cold cranking amps, internal resistance and state of health. Results can appear in seconds. For example, a workshop checking several vehicle batteries can use the readings to identify which ones need closer diagnosis.
- Impedance testing assesses how a battery responds to an alternating electrical signal. The result can indicate internal condition, but it does not recharge the battery or reproduce every operating condition. Compare readings with the tester’s supported battery types and ratings so the assessment is relevant to the battery being checked.
- Use a traditional load tester to observe voltage under demand. It applies a known resistive load and measures the resulting voltage drop. Follow the tester’s instructions and confirm its rating is suitable for the battery. A voltage response under load can reveal weakness that a resting measurement may not show.
- Distinguish short-circuit and open-circuit faults from battery condition. An open circuit means the electrical path is interrupted; a short circuit creates an unintended path. In a charger input test, an open-circuit result points to an interrupted input path. Switch off and disconnect equipment before inspecting wiring. Check continuity with a suitable meter only on an isolated, unpowered circuit. If the charger’s input test or output path indicates a fault, trace the circuit methodically instead of assuming the battery has failed.
Battery charger functions and charging methods
- Match the charger to the battery chemistry and system voltage before connecting it. AGM, EFB and flooded lead-acid batteries behave differently, so a single charging profile may not suit every vehicle. If you manage a fleet with mixed battery types, check each battery’s label and choose a charger setting designed for that chemistry.
- Choose a basic charger when fixed-current charging suits the task. It delivers a steady current rather than adjusting power as the battery changes. A smart charger uses pulse-width modulation (PWM) or a switch-mode power supply (SMPS) to adapt delivery in real time, helping manage the charge as battery condition changes.
- Understand the stages of an advanced charger. Bulk charging supplies the main charge; absorption continues charging as the battery approaches full capacity; float charging maintains it afterward. Some chargers also offer equalisation. Use that function only when it suits the battery and the charger’s instructions, not as a routine setting for every battery.
- Use voltage readings as context, not as a substitute for the correct charging profile. A 12 V battery being charged may read between 13.6 and 14.2 volts. A reading of 13.5 volts or above may indicate float charge. A reading much above 14.5 volts can gas out, so monitor voltage and follow the charger’s instructions.
- Apply a clear sequence when a vehicle won’t start: test the battery, charge it if discharged, then test it again. This separates a low charge from a battery that still fails after charging. For charging or testing safety, match the equipment to the battery, follow the charger and vehicle instructions, and stop if the battery or cables show damage.
- For a suitable charging unit, compare battery charger options by supported chemistry and charging method. The right match depends on the battery type and whether you need basic charging or adaptive, staged operation.
Checking battery-clamp polarity
- Disconnect the charger from the battery before checking its output clamps. Keep the clamps apart so they cannot touch. This test measures the charger directly, not the battery terminals. Use a DC voltmeter to confirm which clamp carries positive output and which carries negative output.
- Set the voltmeter to DC voltage and choose a range that covers the charger’s output. Connect the red meter probe to the charger’s red clamp, then the black probe to its black clamp. Keep the metal probe tips apart while making contact. The charger must be on for this output-polarity check.
- Read the display once both probes make firm contact. A positive voltage reading means the red clamp is positive relative to the black clamp. A minus sign indicates reversed measured polarity: the black clamp is positive relative to the red one. For example, a negative reading means you should check the clamp labels and charger leads before connecting the charger.
- Turn off the charger before correcting a reversed connection or inspecting its leads. Check that each clamp is attached to the corresponding output cable and that the cables show no visible damage. After correcting an obvious connection issue, retest the clamps with the DC voltmeter. Don’t connect the charger to a battery until the polarity reading matches the clamp markings.
- Treat a reverse-polarity indicator as a clue, not proof of a single cause. It can signal reversed battery-clamp polarity or an open circuit in the DC output path, among other causes. If the clamps test correctly but the indicator remains, stop and investigate the output path rather than repeatedly reconnecting the charger to the battery.
What battery voltage and capacity should a charger or tester support?
- Start with the battery label. Match the equipment’s supported voltage to the battery’s nominal voltage before testing or charging. For vehicle and workshop use, check whether you need coverage for 6-volt, 12-volt or 24-volt batteries. A tester limited to one voltage won’t suit every battery in a mixed fleet.
- Separate voltage from capacity when comparing specifications. Voltage identifies the battery system, while capacity is expressed in amp-hours (Ah). For example, the BT60 PRO tester supports battery capacities from 2 to 120 Ah. That range helps you assess whether a tester fits the batteries you handle, rather than relying on voltage compatibility alone.
- Check the tester’s cold cranking amps range if you assess starting batteries. The BT60 PRO supports 100-3,000 CCA, covering the ratings within that range. Compare the battery’s CCA label with the tester’s supported range before use. CCA and amp-hour capacity describe different ratings, so confirm both where your testing task requires them.
- For a charger, match its voltage and charging profile to the battery type. A charger designed for a particular voltage still needs a suitable profile for the battery chemistry. Read the battery and charger labels together. A fully charged battery may read 12.8 volts, but that reading alone doesn’t identify its capacity or prove the charger suits it.
- Choose for the batteries you actually work with, not for a specification that sounds broader. List their voltage, chemistry, Ah capacity and CCA rating, then compare those details with the tool’s supported range. If you need a unit for several battery systems, compare battery testing options by voltage, capacity and CCA coverage before selecting.
Naredi.in: Battery Chargers
naredi.in helps you choose the right battery tool, whether you need to recharge a battery or assess its condition. Choose a battery charger for charging, or a battery tester to evaluate battery health without delivering charge.
Compare options by the battery’s voltage, chemistry and capacity, as well as the charging method or test range your task requires. This is especially useful if you work with different battery types or need to distinguish a charging need from a testing task. The range also includes jump starters and performance additives for related automotive needs.
Visit naredi.in to explore battery chargers and testers for your requirements.
Make your next battery decision with confidence
Make battery checks part of a repeatable process. Record the battery type and purpose of each check, then select equipment that suits the task. This gives technicians and vehicle owners a consistent starting point when a battery needs charging, condition testing or further investigation. A battery charger or tester should fit both the battery and the task, not simply occupy space in a toolkit.
A focused selection process helps you choose the right equipment. Naredi offers Battery Chargers, Battery Testers and Performance Additives, including options for charging and assessing batteries alongside related automotive products. Choose based on the work you need to do and the battery specifications you’ve identified.
For help exploring suitable options, contact naredi.in. A clear match between the task, battery and equipment makes your next step easier. Choose with purpose and put the right tool to work.
Frequently Asked Questions
Battery chargers vs testers, what’s the difference?
A charger replenishes battery energy; a tester assesses its condition. Use a tester to gather evidence before deciding whether charging is appropriate. Use a charger when the battery needs recharging and its charging profile matches the battery chemistry. For a no-start vehicle, testing first helps distinguish a low state of charge from a battery that may not perform reliably.
What is the difference between a battery charger and a battery tester?
A charger changes the battery’s state by delivering electrical energy, while a tester measures and reports its condition. That difference matters when choosing equipment for a vehicle workshop: a charger supports recovery from discharge, while a tester supports assessment and comparison. Test results can guide the next step, but they do not restore the battery.
How do you choose a battery charger or tester for a car battery in India?
Match the equipment’s supported voltage and battery chemistry to the information on the car battery label. Then consider the task: charging requires a suitable charging profile, while diagnosis calls for a tester with relevant measurement capabilities. For mixed vehicle use, check compatibility with each battery type instead of assuming one setting suits every car.
Which charger types are suitable for lead-acid, AGM, and lithium batteries?
Use a charger with a profile designed for the battery’s chemistry. Flooded lead-acid, AGM and lithium batteries have different charging requirements, so a charger suitable for one type may not suit another. Check the battery and charger specifications together. For lithium, select a unit that explicitly supports the battery’s lithium chemistry, such as LiFePO4 where applicable.
How do you test a car battery with a multimeter or battery tester?
For a basic voltage check on a 12 V battery, set a multimeter to 20 volts DC, then place the red probe on the positive terminal and black probe on the negative terminal. A multimeter reading shows voltage, not full cranking performance. A battery tester can assess starting-related measures, so compare its CCA result with the battery’s label.
How long does it take to charge a car or motorcycle battery?
Charging time depends on battery capacity, how discharged it is, its chemistry and the charger’s output. A staged charging process can also affect the time, particularly as charging nears completion. Consider the battery’s condition and the charger specifications together, and follow the charger’s instructions with a profile intended for that battery type.