

Engine Stop Leak Additive: How It Works and When to Use
An engine stop leak additive may temporarily help with some minor oil leaks, but it is not a permanent fix for damaged seals or gaskets. It works by conditioning and swelling certain seals, which can reduce seepage. It cannot repair major engine damage or address every kind of leak.
A small oil spot can leave you wondering whether an additive is appropriate. The answer depends on the leak’s location, the engine’s condition, and whether the formulation is compatible with the oil and emissions equipment. This guide explains how an engine stop leak additive works, which leaks it may help with, and when a mechanical diagnosis is the better next step.
You’ll also learn what to check before adding a treatment to engine oil, including oil specifications and diesel particulate filter compatibility. The key is to treat an additive as a limited option for minor seepage, not as a substitute for finding the cause of the leak.
Key Takeaways
- Match any treatment to the engine oil specification and emissions equipment, including the diesel particulate filter.
- Identify where the oil is escaping before deciding whether a seal-conditioning additive is relevant.
- Overheating or coolant loss alongside a suspected head-gasket leak calls for diagnosis, not reliance on an additive.
- Understand how seal material can respond to treatment, and why that response does not restore every damaged component.
- Follow the product directions for application and timing, then monitor oil levels and any change in leakage.
Compatibility with motor oils and diesel particulate filters
There is no single price for engine oil leak treatment across India. Retail prices vary by formulation, pack size, and brand, so compare the dose and intended use rather than choosing on price alone. Follow the product label for the amount to add and any oil-change guidance.
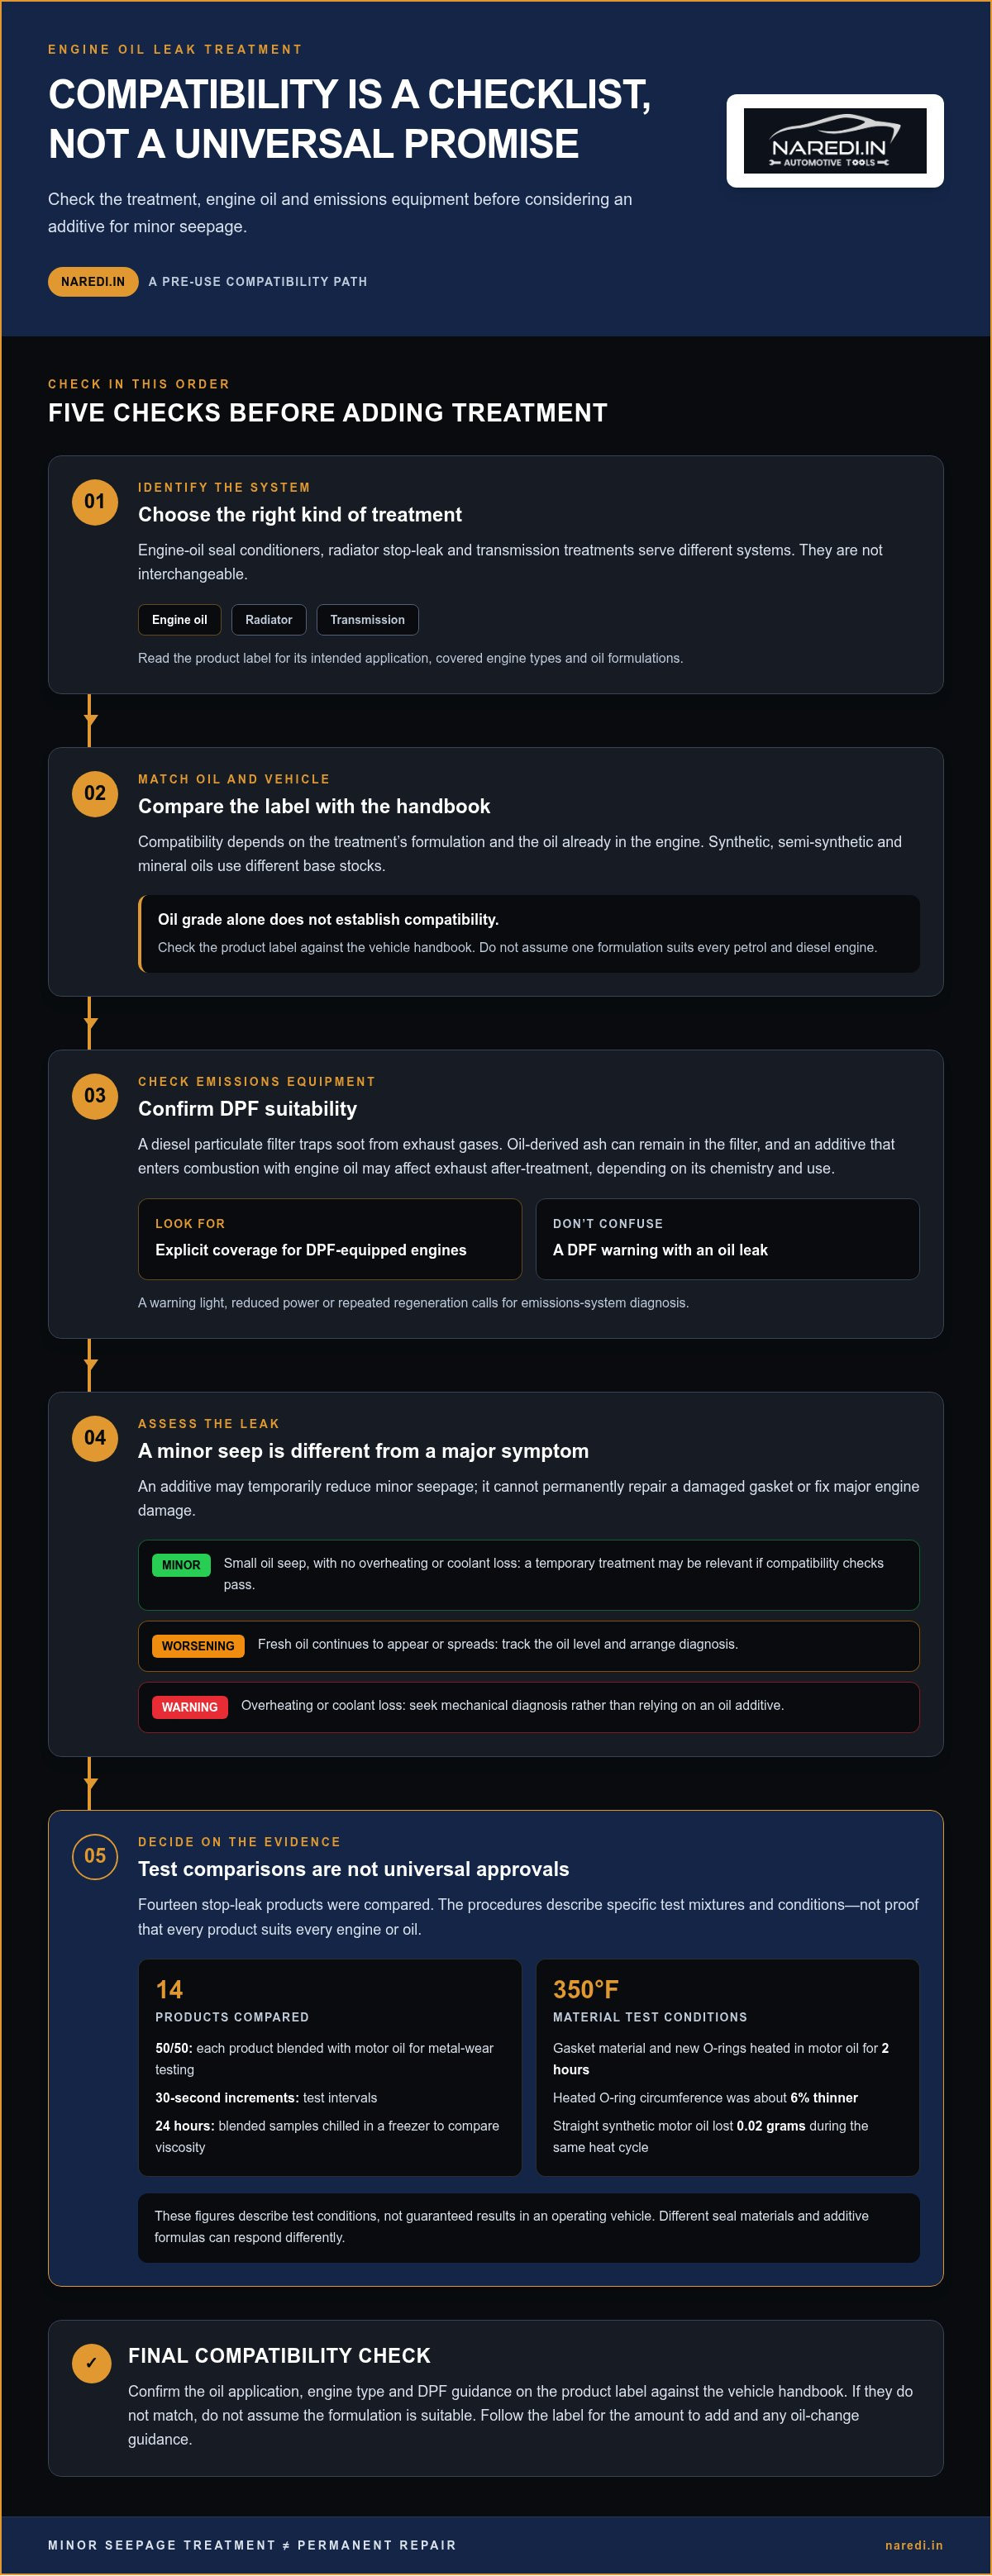
Engine-oil seal conditioners are sold in India as one type of leak treatment, but products have different intended applications. Distinguish engine-oil additives from radiator stop-leak and transmission treatments: they serve different systems and are not interchangeable. Check the label for the engine types and oil formulations covered.
Compatibility depends on the treatment’s formulation and the oil already in the engine. Synthetic, semi-synthetic, and mineral oils have different base stocks, but the oil grade alone does not establish compatibility. Read the product label, then compare its stated applications with the vehicle handbook. Never assume one formulation suits every petrol and diesel engine.
Diesel particulate filters (DPFs) need particular care. A DPF traps soot from exhaust gases, while oil-derived ash can remain in the filter. Depending on its chemistry and use, an additive that enters combustion with engine oil may affect exhaust after-treatment. Choose a product that explicitly covers DPF-equipped engines, and don’t mistake a DPF warning for an oil leak. A warning light, reduced power, or repeated regeneration calls for diagnosis of the emissions system.
Comparative testing illustrates why a single result cannot establish universal compatibility. Fourteen stop-leak products were assessed against one another. For metal-wear testing, each product was blended 50/50 with motor oil, then tested in 30-second increments. The blended samples were chilled in a freezer for 24 hours to compare viscosity. These procedures compare specific test mixtures; they do not prove that every product suits every engine or oil.
Other comparisons examined how treatments affected sealing materials. Gasket material and new O-rings were heated in motor oil at 350°F for 2 hours. The heated O-ring’s circumference was about 6-percent thinner than before treatment, while straight synthetic motor oil lost 0.02 grams during the same heat cycle. Those figures describe the test conditions, not a guaranteed result inside an operating vehicle. Different seal materials and additive formulas can respond differently.
For a petrol or diesel vehicle, check the vehicle handbook and product label together. Confirm the oil application, engine type, and DPF guidance before adding a treatment. If the label does not match the vehicle’s specifications, choose another approach rather than risk an incompatible mixture.
There is no single price for engine stop-leak additives across India. Costs vary by formulation, pack size, and brand, so compare the treatment dose and intended use.
Project Farm tested fourteen engine stop-leak products against one another. The comparison covers those products, not every formulation or vehicle combination. Treat its findings as a prompt to compare the label with the vehicle handbook, not as blanket confirmation that a treatment suits a particular engine or DPF.
Minor cylinder head gasket oil leaks
A cylinder head gasket seals the joint between the engine block and cylinder head. If oil seeps from that joint, an engine stop-leak treatment may temporarily reduce a minor leak. It cannot permanently repair a damaged gasket or restore a failed seal. Treat it as a limited measure, not a substitute for identifying the source of the leak.
First, distinguish a small oil seep from signs of more serious gasket failure. Oil around the cylinder head can be difficult to locate because it may spread across nearby engine surfaces. Clean and inspect the area, then look for fresh traces of oil. A leak that keeps spreading, or occurs alongside overheating or coolant loss, needs mechanical diagnosis rather than an additive.
Overheating and coolant loss are important warning signs because they can point to a problem beyond an external oil seep. Check the coolant level and temperature gauge, and note any changes during normal driving. If the engine overheats or coolant is disappearing, don’t treat the issue as a minor oil leak. Continuing to drive can worsen engine damage.
A treatment is relevant only when the leak is minor, the engine has no major symptoms, and the product suits the engine and oil. Check the label and vehicle handbook before use. Remember that an oil leak at the gasket is not the same as coolant entering the oil or a leak in the cooling system.
- Minor seep: A small amount of oil appears near the gasket, with no overheating or coolant loss.
- Worsening leak: Fresh oil continues to appear or spreads beyond the original area. Track the oil level and arrange diagnosis.
- Major symptom: The engine overheats or loses coolant. Do not rely on an oil additive to address it.
After using a suitable treatment, check the engine oil level regularly. Park on level ground, use the dipstick, and compare readings under consistent conditions. A falling level means the leak is continuing or another oil-loss issue is present. Note visible changes, but don’t assume a dry-looking surface proves the gasket is repaired.
For example, a vehicle with a slight external oil seep and a stable coolant level is different from one that overheats and loses coolant. After checking compatibility, the first case could be suitable for a temporary treatment. The second needs diagnosis of the underlying fault. In either case, monitor the oil level and whether the leak progresses.
Choose a treatment according to its stated application, not a broad promise that it fixes every gasket. Explore engine performance additive options only after identifying the leak as minor and checking compatibility. A persistent or worsening leak still calls for repair of its cause.
A treatment may temporarily reduce a minor cylinder head gasket oil leak when there are no major symptoms, such as overheating or coolant loss. Treat any apparent improvement cautiously: it does not prove the gasket has been repaired. Check the engine oil level regularly to make sure the leak is not worsening, and seek mechanical diagnosis if oil loss continues or increases.
Seal rehydration and regeneration
Rubber seals and O-rings help contain engine oil at joints and around rotating components. Heat and oil exposure can change a seal’s flexibility and fit over time. Seal-conditioning additives are designed to affect that condition, often by helping compatible elastomer seals soften or swell. They cannot replace missing material, close a crack, or correct a damaged housing. “Regeneration” means a limited conditioning effect, not a return to factory-new condition.
Testing provides a useful example of how researchers examine this mechanism. New O-rings were soaked in straight stop-leak products for 48 hours at room temperature. For the O-ring test, the cups contained 100-percent stop-leak product. This is a controlled exposure, not the same as an additive diluted in engine oil during normal operation. Its results should not be treated as a direct prediction of performance inside a vehicle.
The test setup also shows why formulation matters. In an engine, a seal encounters a product mixed with oil; in the test, O-rings were exposed directly to treatment. Material, age, temperature, oil type, and existing damage can all affect a seal’s response. A slight seep from a flexible seal differs from oil escaping through a split gasket or loose fastener.
- Conditioning: A compatible treatment can affect the flexibility or dimensions of some seals.
- Physical damage: A torn O-ring or cracked gasket needs replacement, not chemical conditioning.
- Fit and installation: A distorted seal or incorrectly fitted component may keep leaking after treatment.
An additive and a seal replacement address different problems. A treatment circulates with engine oil and may temporarily reduce seepage from a seal that remains intact. Replacing a worn or damaged seal addresses the component directly and restores the joint when installed correctly.
For example, a lightly seeping rubber seal may respond differently from a gasket with a visible tear. The first may still be flexible; the second has a physical gap. An additive cannot replace missing gasket material or repair a damaged sealing surface. Persistent leakage points to the need for inspection and component repair.
Check the product label to confirm its application matches the engine and oil. Then monitor the oil level and leak area after treatment. A change in seepage is useful information, but it does not prove the seal has been permanently restored. If the leak continues, worsens, or comes from a visibly damaged component, replacement is the appropriate repair.
Application and treatment timing
When to apply a treatment depends on the product instructions, the engine’s oil condition, and the leak being addressed. An additive designed for engine oil goes into the lubrication system, not the radiator or fuel tank. Read the label before opening the container. Confirm the stated engine application, oil compatibility, dose, and oil-change directions.
Start with a clear baseline. Park on level ground and check the dipstick using the method in the vehicle handbook. Note the oil level and inspect the suspected leak area, such as a valve-cover edge or seal. This gives you a point of comparison after treatment. If the oil is already below the safe operating range, address the low level before considering an additive.
Follow the product label rather than assuming every treatment is applied the same way. A typical decision sequence is:
- Identify the leak: Confirm that oil is escaping from a compatible seal or gasket, rather than another fluid system.
- Check the oil: Compare its grade and specification with the vehicle handbook and treatment label.
- Measure the dose: Use the stated amount for the engine’s oil capacity. Don’t estimate by eye or add extra to accelerate results.
- Follow operating directions: Observe the product’s instructions for whether the engine should be running, stopped, or brought to operating temperature.
- Record the baseline: Note the dipstick reading and the leak’s location before monitoring changes.
Timing within an oil-change cycle matters because some treatments are meant to remain in the oil, while others have specific oil-change instructions. Don’t extend an oil-change interval to give an additive more time. For example, if the label directs you to use the product with fresh oil, follow that instruction instead of adding it to overdue oil.
Avoid treatment and repair the leak instead if oil loss is heavy, a component is visibly damaged, or the engine shows major symptoms such as overheating or coolant loss. These signs call for diagnosis of the underlying fault, not an oil additive.
After application, check the dipstick regularly and inspect the same leak area under similar conditions. A falling oil level or fresh oil traces show that the problem persists. Top up only with oil that meets the vehicle specification, and follow the handbook’s procedure for checking the level. If leakage continues or worsens, arrange a repair rather than repeating doses without finding the cause.
For a minor seep with no major symptoms, use only a treatment whose label matches the engine and oil. Follow the product directions for dosage and timing. Regular checks of the oil level and leak location help show whether seepage has reduced or the leak remains unresolved.
How engine oil stop-leak additives work
An engine stop leak additive circulates through the oil circuit, but its exact action depends on the formulation. Seal conditioners target compatible elastomer seals, while other ingredients may change how oil behaves around a small leak. The aim is to reduce seepage at an existing sealing point. It does not weld metal, replace missing gasket material, or fix a loose component.
Engine oil circulates through passages, bearings, and other lubricated parts. Once added, a compatible treatment mixes with the oil and reaches seals exposed to that flow. Some formulations are designed to condition aged seals and help them retain flexibility or fit. This differs from plugging a hole with solid particles, and the label should state the treatment’s intended use.
Can engine stop leak additives fix oil leaks, or are they a temporary solution? They may temporarily reduce a minor leak from a compatible seal, but they cannot permanently repair a damaged seal or gasket. Whether conditioning can help depends on the leak’s location and the seal’s physical condition.
Consider a lightly seeping rubber seal that remains intact. A conditioning formula may affect the seal material and reduce the path through which oil escapes. A torn gasket is different: material is missing, so an additive cannot restore the original surface. The same distinction applies to a loose fastener or damaged housing.
Can stop-leak additives damage an engine, seals, or oil passages? A treatment that conflicts with the required oil or engine application, or is used against its directions, can create compatibility risks. Follow the product label and vehicle handbook, and never exceed the stated dose.
Results depend on more than the product. Seal material, age, oil type, leak location, and the extent of damage all influence the outcome. An engine with a small seep from an intact seal differs from one losing oil through a split gasket. Product tests can compare specific formulations in controlled conditions, but cannot establish performance in every engine.
- Conditioning is not replacement: A flexible, intact seal may respond differently from a cracked gasket.
- Oil compatibility matters: The treatment must match the engine application and specified oil.
- Leak source matters: A damaged component needs repair rather than chemical conditioning.
Use an additive only for the leak type named on its label. Check the oil level and leak area afterward, and treat continued oil loss as evidence that the underlying fault remains. For a treatment suited to minor seepage, explore engine oil performance additives and match the application to the vehicle handbook.
Naredi.in: Battery Chargers
naredi.in helps vehicle owners in India find automotive products for practical maintenance needs. For a minor oil seep, explore the Performance Additives category and match each product’s label to the engine and oil specifications. Battery Chargers meet a separate need: charging or maintaining a vehicle battery, not stopping an engine oil leak.
Use this guidance to distinguish a minor seep from damage that needs repair. If your next requirement is battery-related, consider a Battery Charger or Battery Tester suited to the task.
Visit naredi.in to explore its automotive product range.
Make the Next Maintenance Decision With Confidence
Use the leak’s behaviour to decide what needs attention next. A treatment should support a sound maintenance decision, not delay action when an engine needs repair. If you’re considering an engine stop leak additive, match the product to the vehicle and keep monitoring oil loss. For persistent leakage, focus on identifying and fixing the cause.
naredi.in also offers Performance Additives for product-specific needs, alongside Battery Chargers and Battery Testers for separate battery-care tasks. Choose according to the vehicle issue you’re addressing; these products are not interchangeable. The right next step starts with a clear diagnosis and a product suited to the task.
Explore performance additive options for your vehicle, and move forward with a more informed maintenance choice.
Frequently Asked Questions
What is an engine stop leak additive and how does it work?
An engine stop leak additive is mixed with engine oil to target minor seepage from compatible seals. Its formulation circulates with the oil and may condition certain seal materials. It is different from radiator stop-leak products, which are intended for the cooling system. Never pour an engine-oil treatment into the coolant reservoir; use each product only in the system named on its label.
How do you use an engine stop leak additive safely?
Use the vehicle handbook and product label together. Confirm the engine stop leak additive suits the engine and oil, then add it through the oil-filler opening. Measure the stated dose against the engine’s oil capacity. Don’t combine treatments or add extra to speed up the effect. A coolant-system product does not belong in engine oil, even if its label also mentions leaks.
How long does an engine stop leak additive take to work?
The product directions determine when to assess its effect. Formulation, seal condition, oil circulation, and driving patterns influence how quickly seepage changes. Follow the operating instructions, then compare the leak area and dipstick reading during routine checks. For example, fresh oil appearing after the recommended operating period means the leak remains active and needs further attention.